Troubleshooting
Step-by-step guide to diagnosing and resolving common BCS issues.
Follow the steps below to diagnose issues with the BCS. Select your operating system to see the relevant instructions.
Kill Processes
Remove Existing BCS Instances
The most common scenario when running thebcs.exe is a warning that other BCS processes are already running.
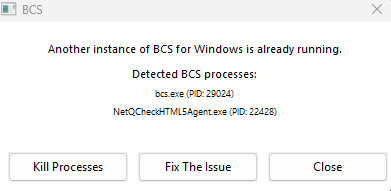
Click the Kill Processes button. When asked to confirm, choose to continue. If a warning appears saying administrator privileges are required, the BCS needs permission to make changes.
To fix this, close the BCS completely. Find thebcs.exe, right-click it, and choose Run As Administrator. Repeat the steps — this time the processes will close properly and the BCS should start normally.
The video below demonstrates each step.
Once the BCS is running correctly, move to Step 3 to test connectivity.
To ensure a clean installation, first verify that no BCS instances exist on your computer.
If the BCS has been installed previously there will be a folder called BCS in your Applications.
Click here for the steps to fully remove it before proceeding with this guide.
Make Sure the BCS Is Running
Download the latest BCS. Even if you already have it installed, download the latest version to ensure compatibility.
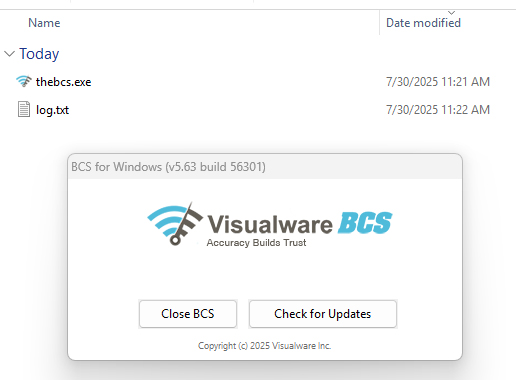
A file named thebcs.exe will appear in your Downloads folder.
Double-click thebcs.exe to launch the BCS. When running successfully, it should appear as shown below.
If a message appears indicating BCS is already running, try restarting your computer before launching again. If the same error occurs immediately after reboot, the BCS is still running as a service and was not properly uninstalled in Step 1.
If BCS launched successfully, proceed to Step 3 below.
Download the latest BCS. Even if you already have it installed, download the latest version to ensure compatibility.
A file named MacBCS.app.zip will appear in your Downloads folder.
Double-click MacBCS.app.zip to extract the BCS application.
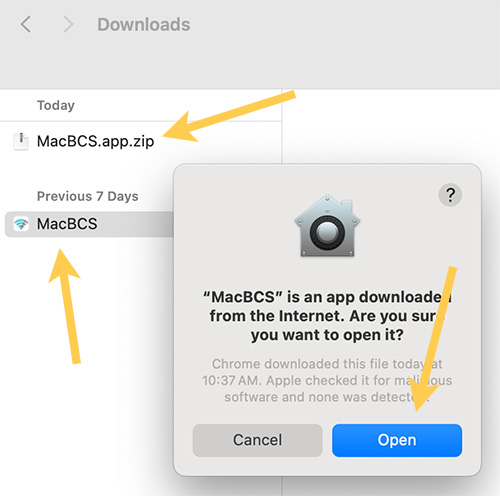
Double-click the extracted MacBCS application to launch it. A security dialog may appear — this is because BCS is distributed outside of the App Store. The application is securely signed and notarized by Apple.
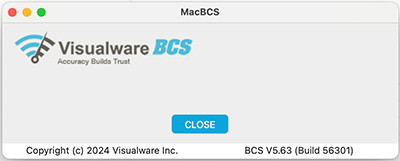
Click Open to continue. The application should appear as shown below.
Test Connectivity
The BCS application should already be running on your computer. If it is not running, the connectivity test will not work.
Click here to run the BCS Connectivity Test. If everything is working correctly, you will see a green banner with a success message. After that, return to the original connection test — it should now work without any problems.
If you see a failure message instead, continue to Step 4.
Change and Refresh DNS Settings
If the BCS is running (as confirmed in Step 2) but the connectivity test still fails, it usually means there is a DNS problem. DNS works like an Internet address book — it helps your computer find the right location online. In rare cases, our address may not resolve correctly, which prevents the connection test from reaching the BCS.
Proxy (Advanced)
If a proxy or VPN is in use, it's important to ensure they allow BCS traffic.
This document goes into more detail on the ports and protocols the BCS uses to communicate.